By Picturepark Communication Team • May 06, 2015
The future of digital asset management relies on data interoperability with other business systems. But when you need to use another system with your DAM today, and you don’t have an integration, you probably still have options. This article explains how Picturepark DAM can be used with WordPress and many other CMS systems, without the need for any type of integration.
Focus on the Goals, Not the Add-ons
When people seek integrations between content management systems (CMS) and digital asset management (DAM) systems, the goals are most often:
- Work within the CMS and access images in the DAM for use on a website,
- Use DAM metadata on the website, for captions, ALT tags, etc.,
- See DAM statistics that show how many times a given asset was displayed,
- See in the DAM which assets have been used on the website, and
- Update an image placed on the website, without having to update it in both systems.
These goals are, in fact, what guides the development of Picturepark’s own CMS integrations, such as our DAM connectors for Sitecore, SharePoint and Typo3.
And while proper DAM/CMS integrations can be impressive, much of the functionality they offer can be replicated without any additional software at all. This is important because there will always be software applications for which integrations haven’t been built.
Integration Shortcomings
To listen to software vendors today, you might think that no business was possible before the advent of automation or business system integration. But as this CMSwire article suggests, sometimes we can complicate things with layers of software that don’t actually improve things.
One of the challenges to developing DAM/CMS integrations is that each CMS instance (installation) can vary dramatically. For example, within the WordPress community, there are scores of different themes that each have their own proprietary “shortcodes” that are intended to simplify formatting.
For example, in some popular themes, the shortcode {responsive} is used to tell WordPress that it should automatically resize an image based on the user’s screen size. But other WordPress templates handle this differently. So, even when an “automated” integration is available between WordPress and a DAM, users often have to manually tweak the resulting code to work as expected within their chosen theme.
Integrations are also susceptible to breaking when either the DAM or CMS is upgraded. This problem is most common when either system is Cloud-based and upgrades are performed by the vendor, without consideration to any connected systems.
In addition, integrations can be costly, and they typically require the involvement of an integration expert or IT personnel to get and keep them working. Few enterprise software integrations come “out of the box,” because virtually all software situations differ. So some level of complexity is a given.
Integration Strengths
On the other hand, when an integration is working, it can be a real-time-saver: click a button in your CMS and a portal into your DAM appears; find and select what you want, and it’s placed right into the Web page editor.
Integrations can also enable users to connect to your CMS and access DAM-managed assets without having a DAM account. (Not all DAM/CMS integrations support this feature.)
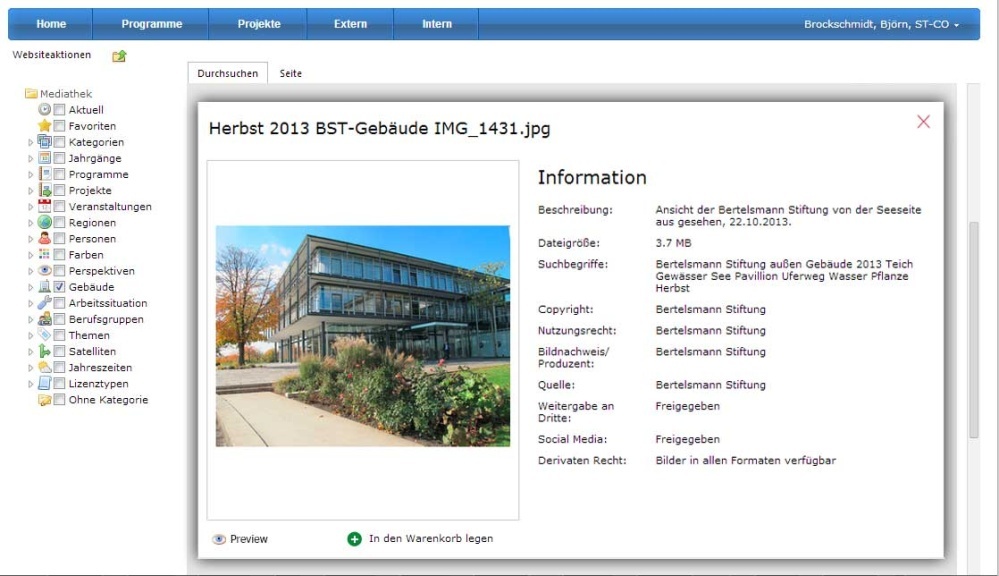
The Bertelsmann Foundation uses Picturepark from within SharePoint. This integration provides “invisible” Picturepark access to SharePoint users.
Examples of when an integration would be desirable (or required) over the approach described in this article include:
- One or both systems offer no means to access content directly via Web link
- User decision making must be removed from the workflow
- A large amount of data is moved between the systems, or data is updated regularly or at least often
In the remainder of this article, you’ll see how Picturepark content creators develop blog posts and then use Picturepark as a real-time image server for WordPress.
Getting Started
Two things you’ll need to following along:
- A Web CMS system that enables you to embed links (URLs) to external assets. We’ll be using WordPress, but other systems will work too.
- A DAM that enables you to create share links to asset derivatives (formats) that are suitable for website use. We’ll be using Picturepark because it automatically creates sharable, Web-ready derivatives and, of course, it’s what we prefer!
As you can see, the requirements are pretty basic. The trick lies in understanding how your DAM and CMS work so that you can leverage features they already offer, before you find yourself paying for additional software that you might not need.
(Note than the following works with Picturepark Cloud and Onsite systems, because all Pictureparks are browser based.)
Workflow Overview
Picturepark blog posts are written in Microsoft Word for a few reasons:
- Posts are easier to share internally for approvals, when required
- Posts can be more easily localized into other languages
- Print-ready PDF versions can be easily created, if ever required
Picturepark’s internal media standard for master image storage is layered TIFF. When screenshots and other images are created for posts, they are saved in this format into the same folder as the blog post document. From there, they are linked to the Word document at full resolution.
Once the text of a post is complete, it is pasted into WordPress and the images are added as Picturepark links, as described below.
Workflow as the Integration
This workflow was developed so that Picturepark content creators could avoid having to use the WordPress media library feature which, for experienced DAM users, is a disappointment. Also considered was the need to adhere to digital asset management best practices, such as having a metadata-rich, single-source archive that doesn’t require that the same content be uploaded in a multitude of different file formats.
Here’s a look at the before and after workflows for creating screenshot images that are used within Picturepark website pages and blog posts:
Screenshot creation workflow
| Before | After |
| Take the screenshot and open it in Photoshop for editing | Take the screenshot and open it in Photoshop for editing |
| Add text, highlights and other annotations | Add text, highlights and other annotations |
| Save the image as a layered TIFF (master) so that it remains editable | Save the image as a layered TIFF (master) so that it remains editable |
| Export a Web-ready version, making sure to select the best format, given the content (JPG, PNG-8, PNG-24, etc.) | Upload the TIFF master to Picturepark and add metadata |
| Upload the TIFF master to Picturepark and add metadata | Link the TIFF master to the blog post draft in Word |
| Upload the Web-ready version to WordPress (and wish you can even add a simple tag to make finding it later easier) | Create share link for use in WordPress |
| Link the TIFF master to the blog post draft in Word |
One of the invisible benefits of the “after” workflow is that the master image uploaded to Picturepark is used thereafter for everything—print, PowerPoint, website, etc. There’s no need to create purpose-specific versions because Picturepark handles that for you. Further, if you update the master, all derivatives are updated automatically.
Here’s the workflow that occurs when a screenshot is updated:
Screenshot editing workflow
| Before | After |
| Open the image from Picturepark in Photoshop (either download to desktop or use Picturepark Creative Connector) | Open the image from Picturepark in Photoshop (either download to desktop or use Picturepark Creative Connector) |
| Edit the image as needed | Edit the image as needed (people who edit the images don’t require WordPress accounts in this workflow) |
| Save master file back to Picturepark as a new version | Save master file back to Picturepark as a new version |
| Export a Web-ready version, making sure to select the best format, given the content (JPG, PNG-8, PNG-24, etc.) | |
| Upload Web-ready version to WordPress (make sure plugin is available that permits you to replace existing media) | |
| Clear WordPress cache (if necessary) so that updated image is shown |
As soon as a new version is checked in to Picturepark, the Web-ready derivative is updated to reflect the changes. Because the link from WordPress is live, there’s no concern that the WordPress cache will display the older version. (Cached images can be a temporary concern within individual Web browsers, but this would affect either option equally.)
Finally, when we want to see how many times an image has been displayed or a PDF (or other format) has been downloaded, we can look in Picturepark rather than a global website analytics package. This enables all permitted Picturepark users to see website asset statistics, without requiring analytics accounts of their own.
Screenshot statistics workflow
| Before | After |
| Use Google Analytics to estimate number of impressions and/or downloads, based on number of page views | Open Statistics tab in Picturepark and see absolute number of views or downloads |
| If the image is suspect for not adding value to the page, return to first workflow and start over | If the image is suspect for not adding value to the page, upload a revised version or swap the link with another asset in Picturepark |
You can see that the screenshot creation workflow is somewhat shorter with the “after” method, but the time savings for the editing workflow is significant.
Because the statistics come from Picturepark instead of WordPress, they can be factored into the global statistics for the asset, which are not dependent on output channel. If images were uploaded to WordPress directly, we would lose the ability to see their statistics as a whole, or to compare their performance to other assets.
Using Picturepark as a Media Server for WordPress
To get started with this example, we connect to Picturepark and WordPress, with each app opened in one tab of the browser.

Good news for Google Docs fans
The following examples work the same for Google Docs as they do for WordPress. When inserting images from Picturepark into Google Docs, use the Google Docs menu option: Insert > Image > By URL. Then paste the Picturepark share link, as explained below. (Link to a high-resolution derivative (format) if you plan to print your document.)
Upload the new screenshots
Once all the screenshots have been created, edited and linked to the Word document, they are uploaded in bulk to Picturepark.
The Screenshot class is assigned so that relevant metadata fields become available. This step requires Adaptive Metadata, which is not currently available with other DAMs, but it is not required for this workflow example. (If you’re following along using a DAM other than Picturepark, you might be able to add these values to a Notes or Comments field.)
Metadata is added.
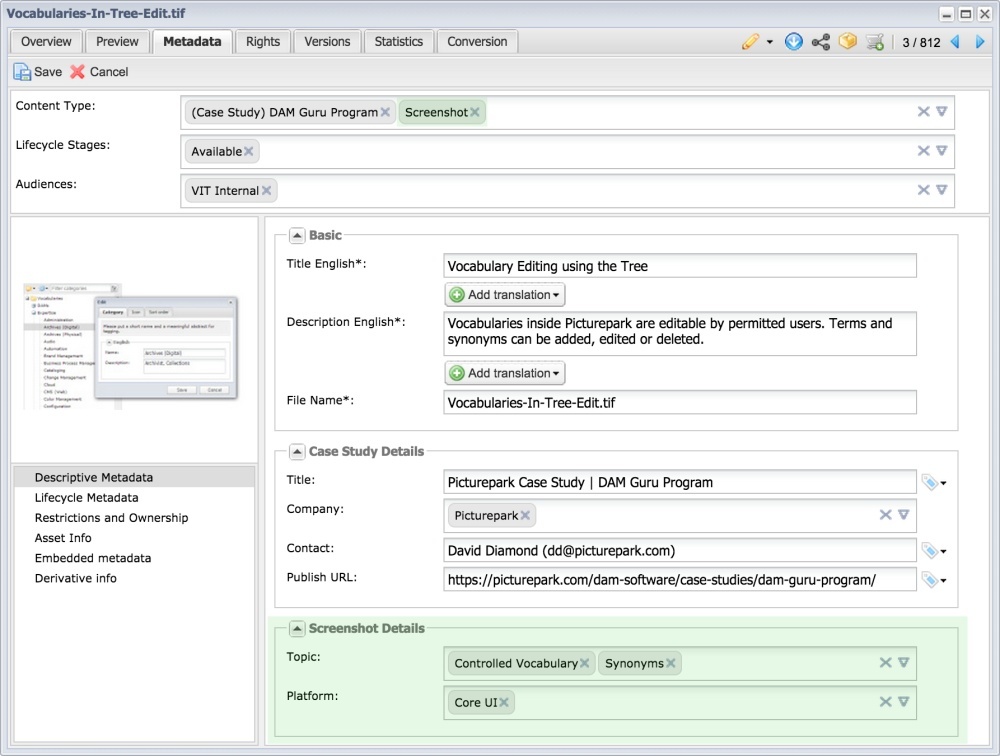
When the Screenshot class is added, new fields appear that pull values from controlled vocabularies.
Create a share link
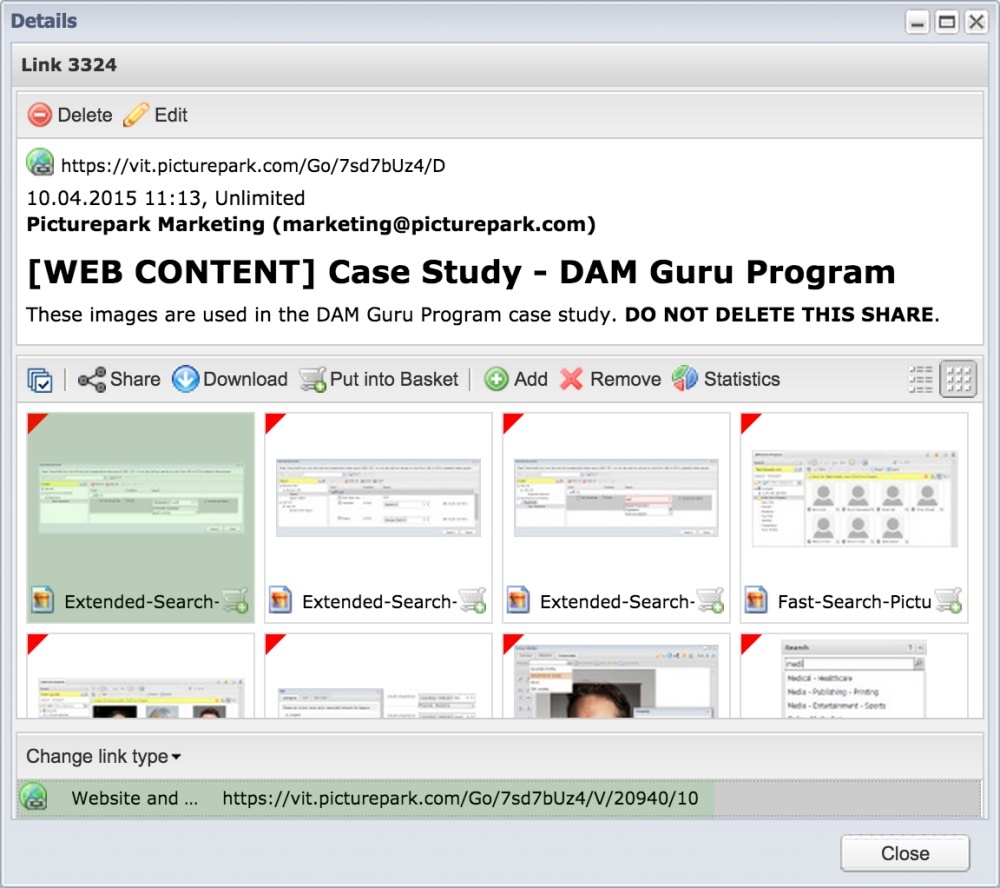
All images used in the post are selected and the Picturepark Share option is used to create a new share. Among the derivative options available in our internal Picturepark system is one configured specifically for our website. This format provides assets in a Web-suitable format that is large enough to provide detail, yet not so big that it slows down page load times.
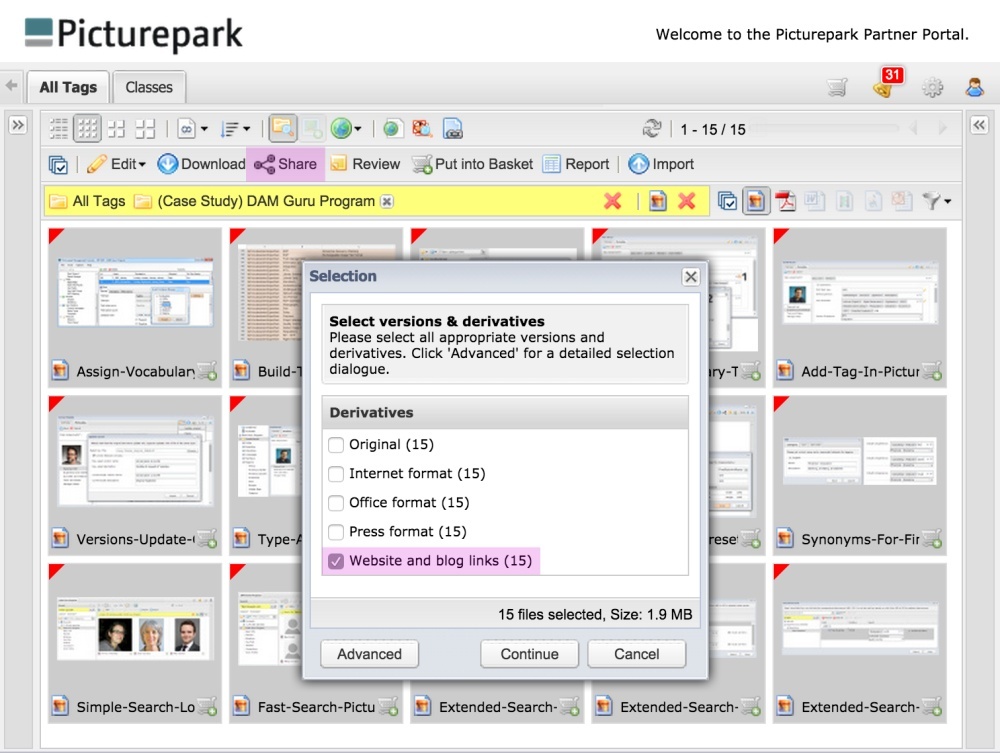
With all assets selected for a post (in this case, the DAM Guru Program case study), a single share is created using the derivative most suitable for website use. (The red triangles indicate the rights template assigned to these assets.)
When more than one asset is included in a share, Picturepark generates a “master” share link for the collection as a whole. Though you won’t be using collection links in your posts, they do provide a handy means for managing the images of a post as a unit. (If you needed to share or download all the images from within a single link, this is the link you would use.)
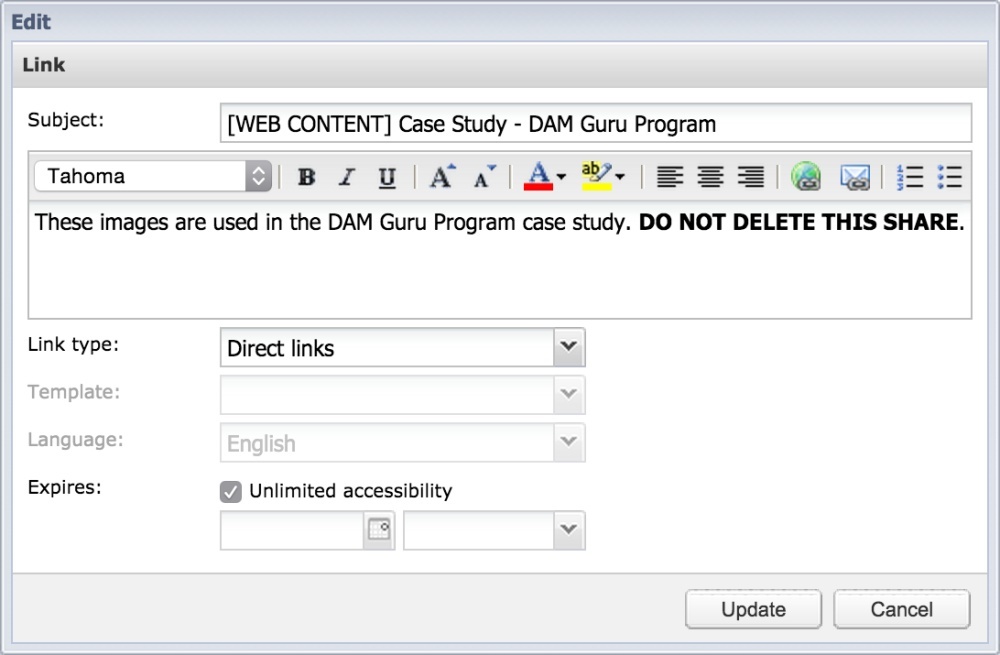
The share is named and given an expiration date, if necessary. In this case, because we are creating live links for the Picturepark website, we configure the share to remain valid indefinitely. The description is used to alert other users as to the purpose of the share. The “do not delete” warning is included so that other users who have the rights to delete the share (such as system admins) will know not to. It’s a also a good reminder to the person who created the share.
We name each share for the associated blog post so that it can be easily identified later. Assets can later be added to (or removed from) the share, if ever needed.
Shares always deliver the most recent version of an asset, so no changes to the share are required if any of the included assets is updated.
Paste individual links into WordPress
Every asset within the shared collection has its own link—these are the links we’ll use in WordPress. You can see these links by selecting a single asset within the shared collection.
When an individual asset is selected within the shared collection, the direct link to the asset is displayed. This is the link we’ll use in the CMS.
Try the link for yourself: https://vit.picturepark.com/Go/7sd7bUz4/V/20940/10
Select the link you need and copy it.
Switch over to the WordPress tab and place your cursor within your blog post where you want the image to appear. Click the Add Media button and select the Insert From URL option. Paste the link and WordPress will fetch a preview of the image.
At this point, you could also copy over a caption or ALT tag from Picturepark metadata too. We use the Description field, but you can use whatever field you prefer. (You might even have a “Social Share” class that provides a field specifically intended to hold the asset’s ALT value.)
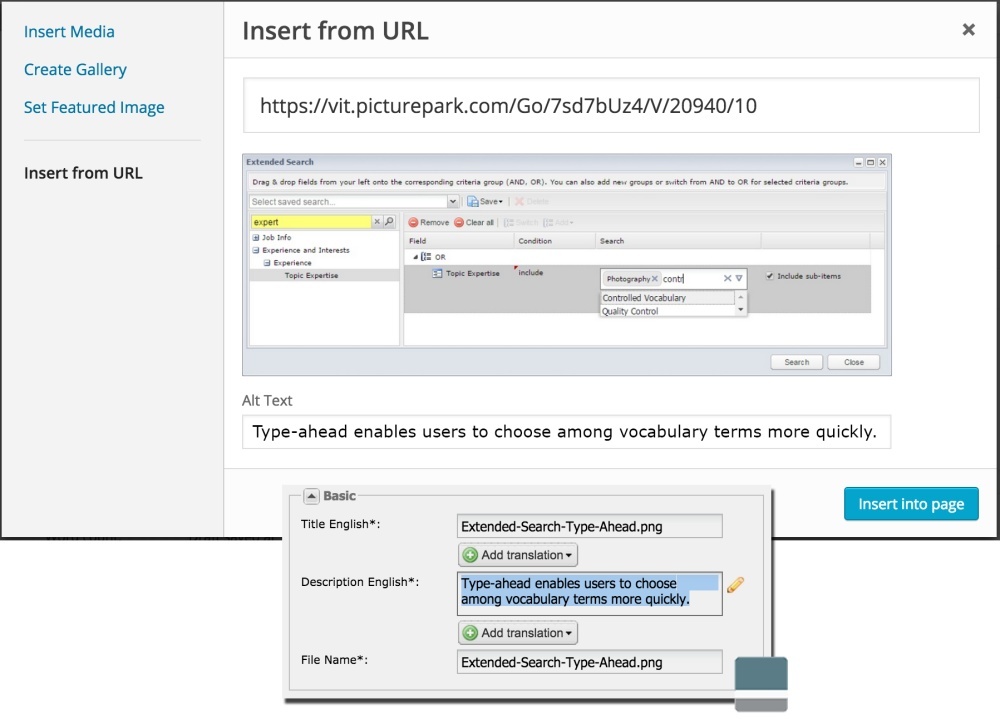
WordPress shows a preview of the linked image and provides a field for the ALT tag value, which we copy from Picturepark.
Each time the page is loaded, the image will be pulled live from Picturepark and the Picturepark stats page will be updated.
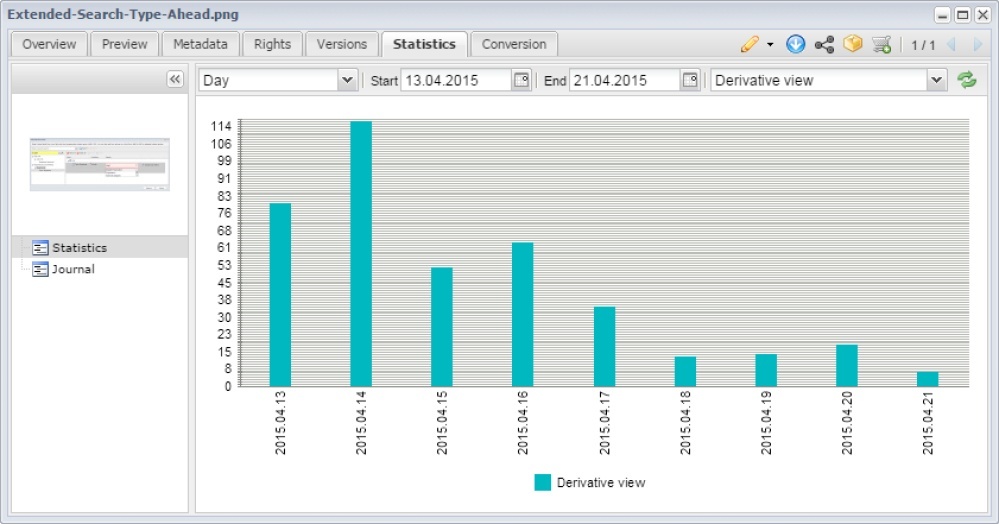
Views of the asset during a specific date range are shown. The Journal option provides a list view of the stats, which includes a date/time stamp and specifics about which derivative type was displayed. This is how you’d be able to see which were website views.
Benefits Summary
In addition to avoiding the need for a software integration to use Picturepark with WordPress, this workflow offers a few other benefits too:
- The full-resolution master images in Picturepark can be used for other purposes too, without having to create separate files
- If we want to create a print-ready version of a post, we simply save the Word document as a PDF. Because the document links to the full-resolution master images, the output will look great
- All asset links are live, which means that edits are properly reflected and older versions never remain on the website
- The derivatives Picturepark creates are custom configured for our website, so they’re the right size and format
- Video placed on the website can stream directly from the Picturepark global Cloud
- Picturepark users can see which assets have been used on the website, without the need for a WordPress login
- Picturepark users can see statistics for website views and downloads in the same place they see global statistics for each asset, again, without the need for a WordPress login
Shopping Advice
Before deciding that a software integration is a requirement for your workflow, first consider the steps of a manual workflow. You might find that you already have all the tools you need to achieve the results you expect the integration to provide.
At the very least, make sure that any DAM/CMS integration you consider provides functionality or convenience you consider to be a significant improvement over the manual alternative. Otherwise, you’re buying into an integration that will likely provide more complexity and cost than value.
Also, check out the various WordPress themes available online which may change the look and feel of how your images are presented e.g. themes for community sites by Wbcom Designs.