|
You can import new assets into Picturepark using the browser or the batch import.
 Tip Tip
The filename of the file you are importing should not contain the following special characters (this list is not exhaustive): " * / \ '
|
Browser Import
Assets can be imported directly into Picturepark using your browser. The browser import can be used by clicking on Upload in the asset toolbar.

The import can be completed in 5 steps in the window that opens.
File Import
In a batch import the desired assets are first uploaded to an FTP directory and then imported using the file import function in the administration menu in Picturepark.
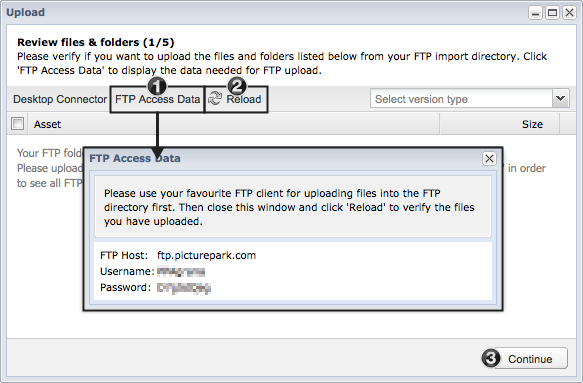
- The FTP login details can be viewed under FTP Access Data
- You can click on reload after the files have been uploaded into the FTP directory to refresh the list of uploaded files in the lower area.
- Once you have made your selection of the files you would like to import from the files in the list you can import these by clicking on continue.
 Tip Tip
In step 2 you can choose if you would like to import all folders from the import directory into Picturepark or import only the files without structure in the selected category.

|
 Step 1 - Selecting Files Step 1 - Selecting Files
You select the files you would like to import in the first step.
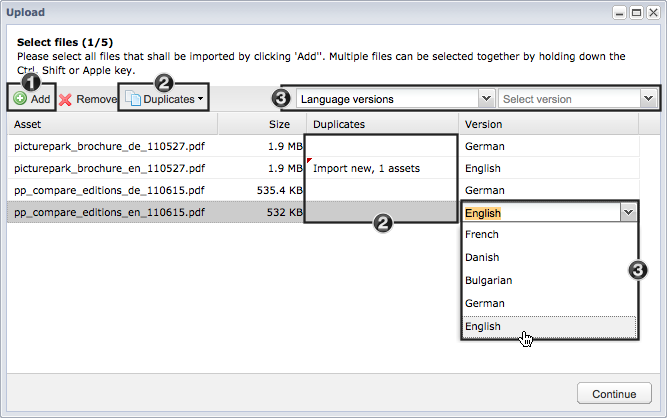
- The files you would like to import can be selected by clicking on the add button. Files can also be added to the import window directly from Windows Explorer or the Mac Finder via drag & drop.
- Duplicates are files that have already been imported into Picturepark. Depending on your requirements, there are different options available for how these duplicates should be handled:
- Import as new: The existing asset in Picturepark is ignored and the selected asset is uploaded as a new asset.
- Replace duplicates: The existing asset in Picturepark is replaced with the selected file. The asset Id is retained.
- Replace and add to target category: The existing asset in Picturepark is replaced with the selected file. This asset is also added to the target category of the current import.
- No replace but add to target category: The selected file is not imported. The existing asset in Picturepark is added to the target category of the current import.
- Skip: The file is excluded from the import.
You can either make a selection for all the assets that are to be imported (Duplicate Button), or individually for each file (drop down for each file in the duplicate column).
- The desired versions can be assigned to the assets on upload. The assignments can be made for all the assets at once or for each file individually.
 Tip Tip
The duplicate search only checks assets on which the logged in user has rights. If a user does not have rights on all assets, then duplicates can not completely be excluded.
|
|
 Step 2 - Defining the Metadata Step 2 - Defining the Metadata
The metadata can be defined in the second step. All the files are tagged with the same metadata. Each asset can be edited individually after import.
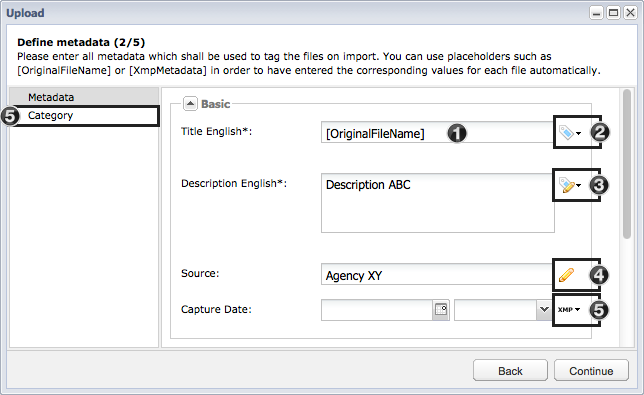
- Here you can fill out the metadata for each field.
- This icon shows, that for this field there is a standard default value that is filled out (in the above example this is the original file name).
- If the default value is changed, then this is shown by the corresponding icon.
- As soon as values are changed for fields that do not have a default value, then this icon is shown.
- If there is an XMP mapping for a field, then this is shown using this icon.
- You can select the categories you would like to add your assets to in the "Category" panel.
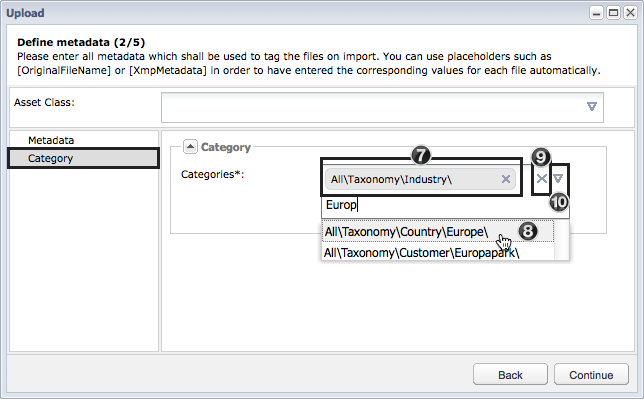
- Already added categories are displayed as a box and kann be removed via the "X" next to the category path.
- Suggestions for the keywords entered are automatically shown. You can now select an entry from the list.
- The category assignments can be removed with the "X" on the right border.
- You can open a window to select more than one category at a time by clicking on the arrow.
 Tip Tip
In some fields default values have already been entered. For example [OriginalFileName] or [XMPMetadata]. These fields are automatically filled with the corresponding values.
|
 Tip Tip
If a default value is overwritten, then this can by reset by deleting the values in the field or via the menu with the corresponding icons. The placeholder [DefaultValue] or[XMPMetadata] is then shown.

|
 Tip Tip
If an XMP mapping for the field was created, then a tooltip is shown over the corresponding field that shows how the field is mapped.

|
|
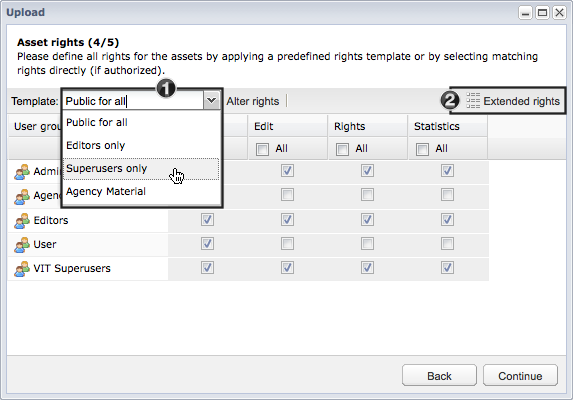
 Step 4 - Asset Rights Step 4 - Asset Rights
In this step the rights for all the files that are being imported are set.
- Selection of the appropriate right template. Depending on your authorization one or more rights templates are available.
- By clicking on "Extended Search" the overview of the rights can be extended so that all details are visible.
 Tip Tip
Depending on the rights of the logged in user right templates can be individually altered using the alter rights button. This function should however be avoided as a rule for the sake of clarity.
|
|
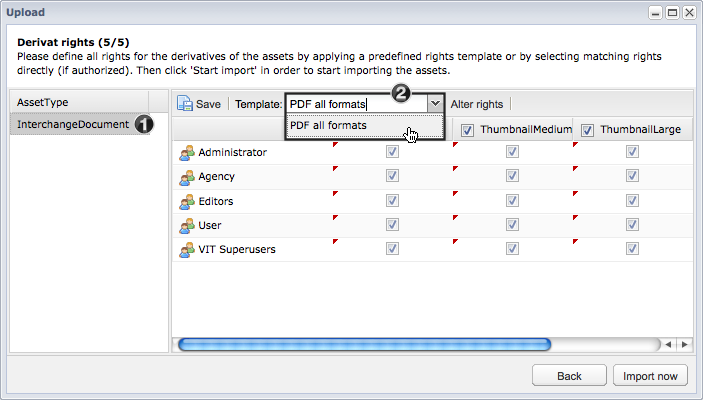
 Step 5 - Derivative Rights Step 5 - Derivative Rights
The derivative rights are different depending on the file type. The desired derivative right needs to be individually selected for each file type.
- Selection of the file type
- Selection of the appropriate rights template. Depending on your rights one or more rights templates will be available.
 Tip Tip
Depending on the rights of the logged in user right templates can be individually altered using the alter rights button. This function should however be avoided as a rule for the sake of clarity.
|
|
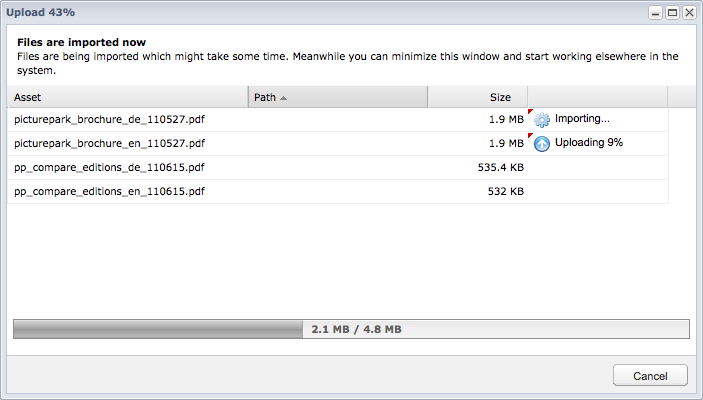
 Import Import
You can see the progress of the import during the import. After the import has completed the new assets can be processed further directly by adding these to the basket or editing them with the batch edit.
 Tip Tip
The import is canceled on closing the window. The window can however be minimized if you would like the import to continue in the background.
|
|
|


